General settings
The Settings page is the command center of your EML AdminTool. From here, you can manage the identity of your panel, monitor your server’s health, manage updates, and most importantly, control who has access to your launcher configuration.

Global information
The top section displays the current identity of your EML AdminTool. Hover over the section and click on the “Edit” button () to modify these values.
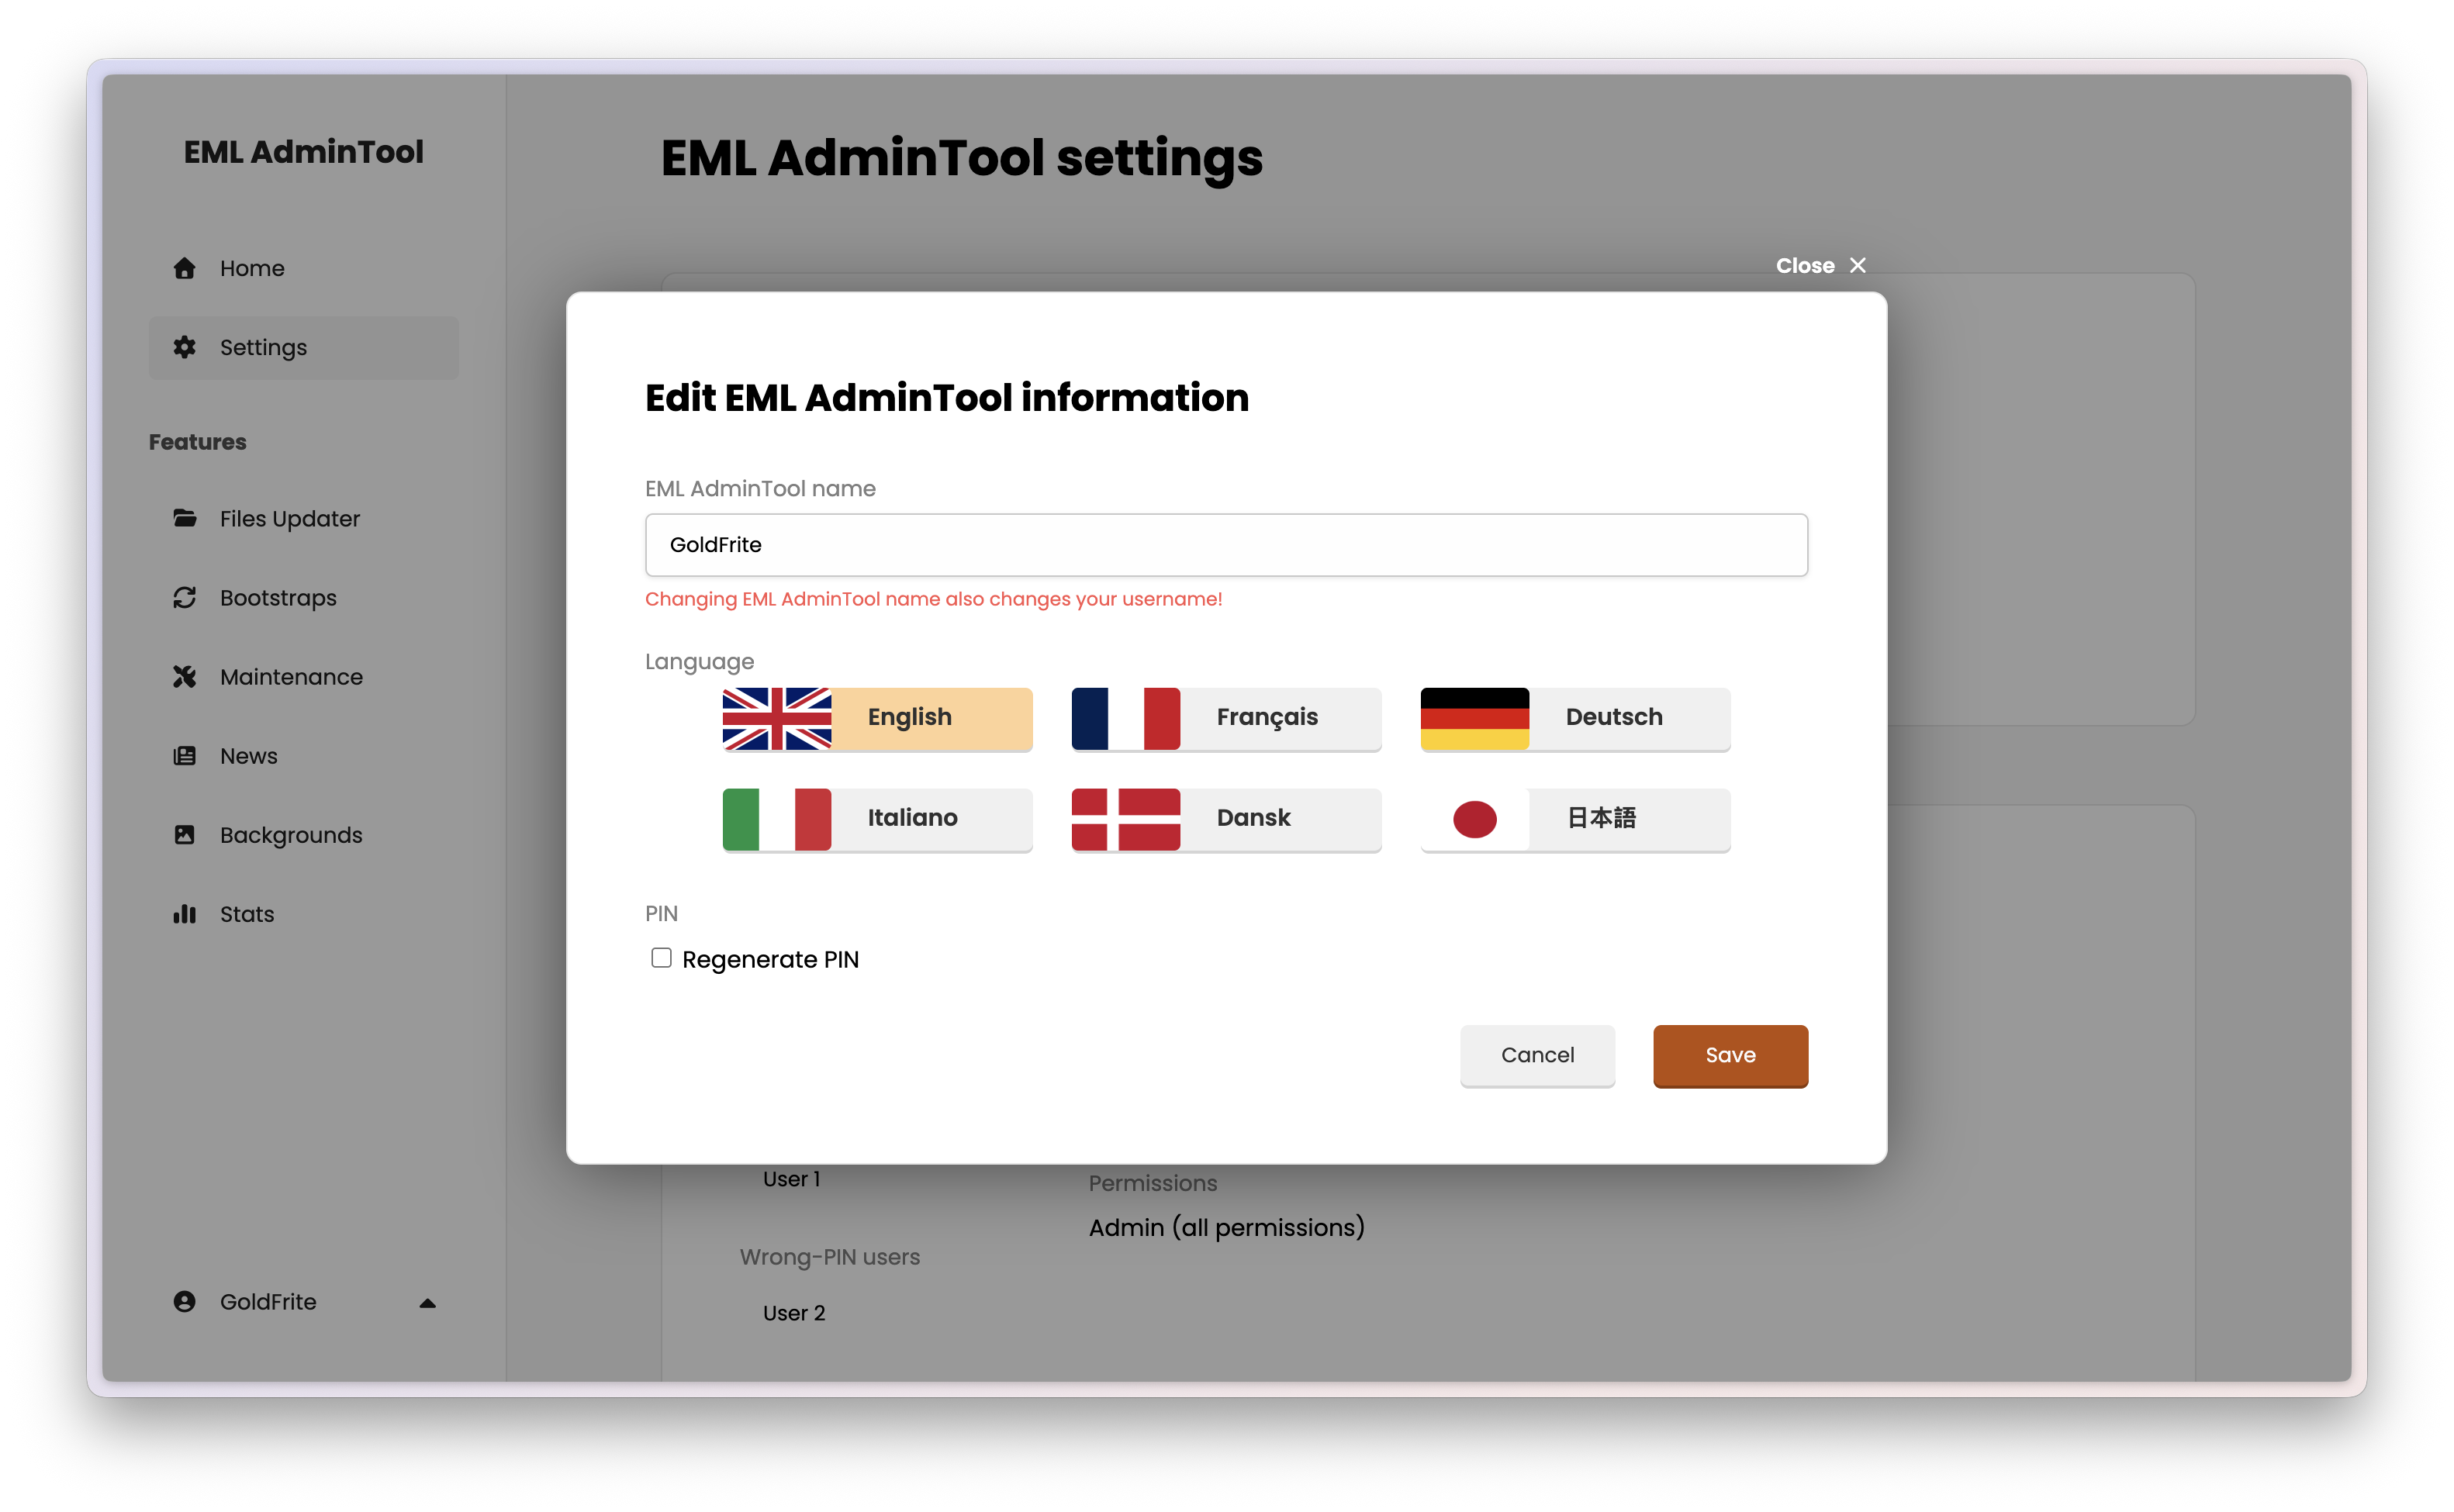
Name: This is the global name of your EML AdminTool instance (e.g., “MyServer Admin”).
Warning
Changing the EML AdminTool name also changes the username used for the main administrator account. If you change “MyServer” to “NewProject”, you will need to log in as “NewProject” next time.
Language: Select the interface language (English, French, German, Italian, Danish, Japanese).
PIN code: This is a security code used for registration (more below).
User management
Security is paramount. The EML AdminTool uses a “Request & Approve” system for new users.
The registration flow
- You give the PIN code to a new staff member.
- They go to the EML AdminTool login page and select “Create an account”.
- They enter the PIN and their desired username.
- They appear in your dashboard under the “Pending users” list.
Note
In all cases, new users can log in before being approved, but they have no permissions and cannot do anything until you approve them. Moreover, if the PIN code is incorrect, the user will not be informed, and they will appear in the “Wrong-PIN users” list instead.
Approving a user
When a user is in the “Pending” list, click the check button () to review their request. You will be presented with a permission modal.
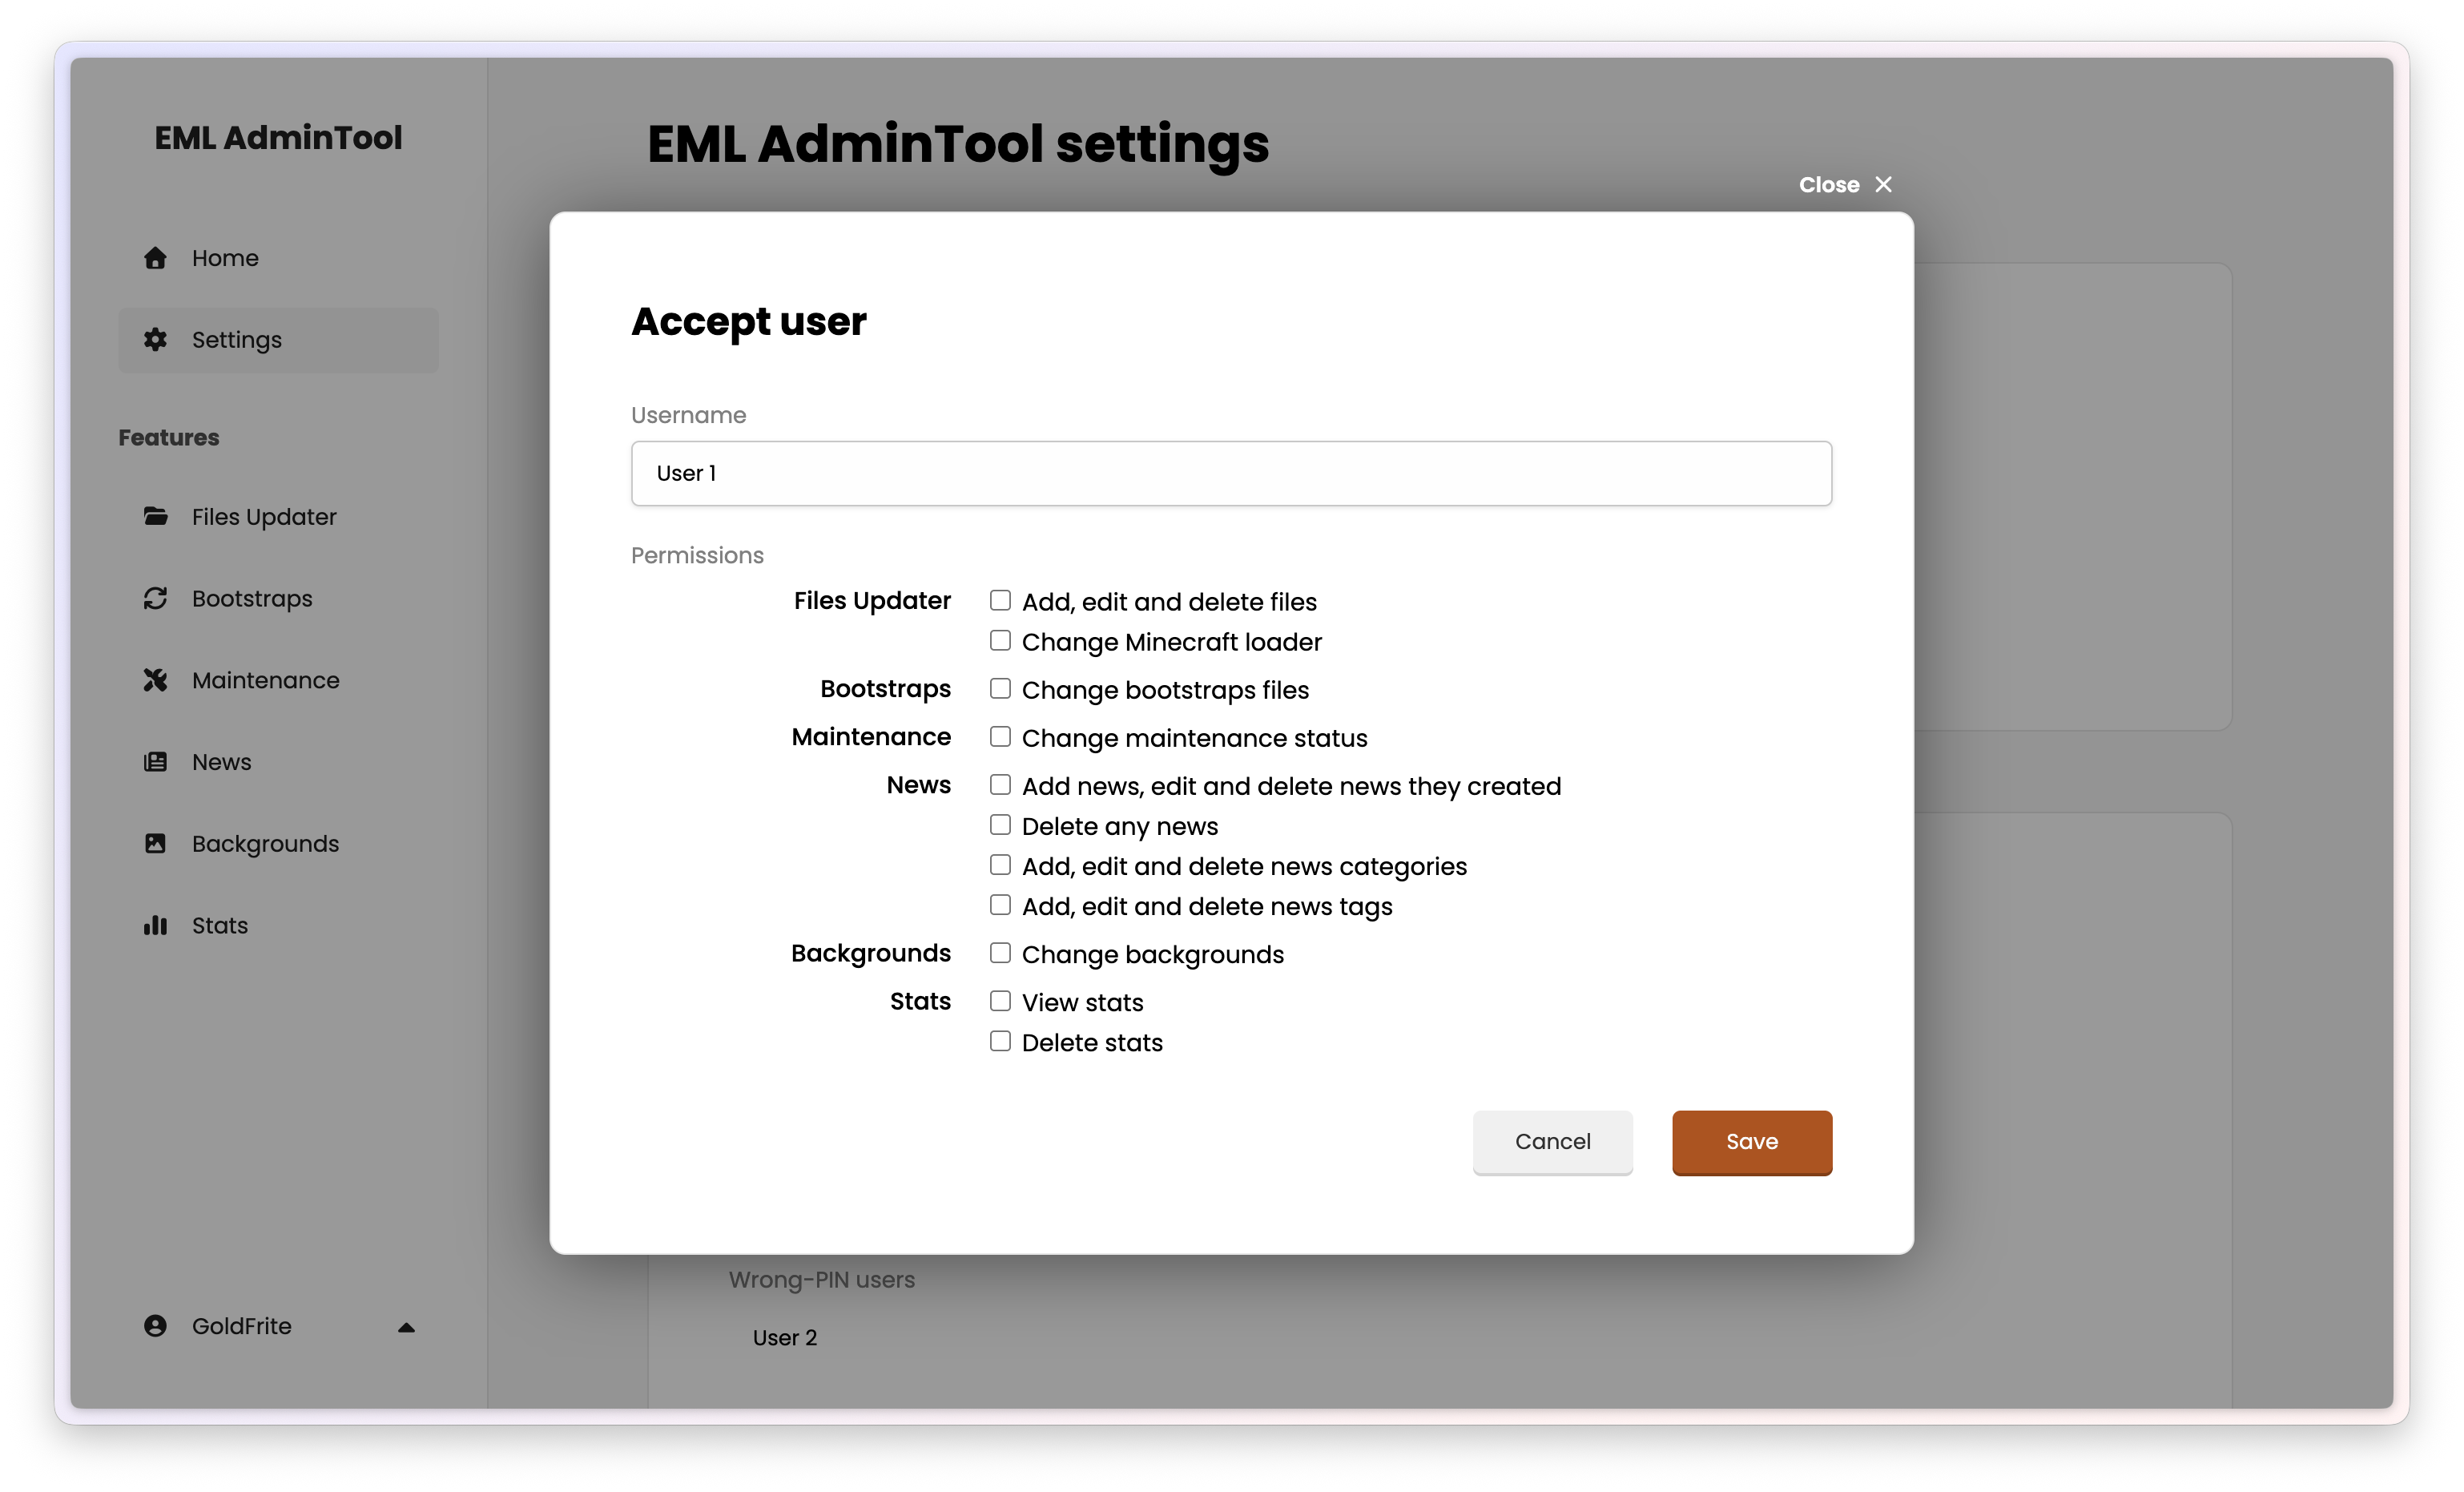
You must explicitly grant permissions to define what they can do:
| Permission | Description |
|---|---|
| Files Updater | This option gives access to uploading, editing, and deleting game files (mods, configs). This is the key permission for managing game content that the launcher uses. |
| Bootstraps | Launcher includes a automatic update system called “Bootstraps”. This permission allows managing these bootstraps by changing the install files. |
| Maintenance | Allows toggling the maintenance mode to lock launcher access. |
| News | This option gives access to managing the news feed, including adding, deleting, and managing categories and tags. |
| Backgrounds | Allows changing the launcher’s background images. |
Once you click “Save”, the user can log in.
If you do not want to approve the user, click the cross button () to delete their request. The user will be moved to the “Deleted users” list.
Managing existing users
Click on any existing user to see their permissions. To modify them, click the “Edit” button (), change the permissions, and click “Save”.
To delete an existing user, click the trash button () next to their name. This action is irreversible, but the user information and data (such as news) are kept, and the user is moved to the “Deleted users” list.
Deleting users
Users in the “Deleted users” or “Wrong-PIN users” lists can be permanently removed by clicking the trash button () next to their name. This action is irreversible, and all their data (news, etc.) will be permanently deleted.
Update and system status
This section provides a quick overview of your infrastructure health.
Update: Checks if a new version of the EML AdminTool is available. If so, a button appears to install the update.
Warning
Always read the release notes before updating. Some updates may require manual steps.
VPS & Docker:
- Docker Information: Displays the underlying OS kernel version.
- Storage: Shows the disk usage of the Docker container.
Tip
Keep an eye on the storage bar. Modpacks and assets can be heavy. If it reaches 100%, you won’t be able to upload new files.
Danger Zone
- Reset EML AdminTool: This button performs a complete factory reset of the database.
Caution
This action is irreversible. It will delete all users, all news, and all configurations. Only use this if you want to start fresh.
Advanced — Changing domain or IP
If you move your EML AdminTool to a new server, if you switch from a local IP to a public domain name, or if you change your domain, you must update the configuration manually.
The EML AdminTool protects itself against Cross-Site Request Forgery (CSRF) by strictly validating the origin of the connection. If the domain doesn’t match the configuration, you will be unable to log in.
How to update the configuration:
Connect to your server via SSH.
Navigate to your installation directory (default is
~/.eml/admintool).Edit the
.envfile:nano .envUpdate the
ORIGINandALLOWED_ORIGINSvariables:# EML AdminTool Environment Configuration NODE_ENV=production ORIGIN=<MAIN DOMAIN, SEE BELOW> ALLOWED_ORIGINS=http://localhost:8080,http://127.0.0.1:8080,http://<your-local-ip>:8080,http://<your-public-ip>:8080,http://<your-domain>,https://<your-domain>Replace
<MAIN DOMAIN, SEE BELOW>with the main domain you will use to access EML AdminTool:If you plan to access EML AdminTool using a domain name and HTTPS later, enter the domain with format
https://<your-domain>(for example,https://at.emlproject.pages.dev). This is the recommended option.if you plan to access EML AdminTool using a domain name but without HTTPS later, enter the domain with format
http://<your-domain>(for example,http://at.emlproject.pages.dev).If you do not have a domain name, enter the public IP address of your VPS with format
http://<your-public-ip>:8080(for example,http://104.21.22.180:8080).If you only want to access EML AdminTool on your local network, enter your local IP address with format
http://<your-local-ip>:8080(for example,http://192.168.1.100:8080).If you only want to access EML AdminTool on your computer, enter
http://localhost:8080.
Replace
<your-local-ip>,<your-public-ip>, and<your-domain>in theALLOWED_ORIGINSvariable with the appropriate values (you can remove any value you don’t need, or add others). It is recommended to keep bothhttpandhttpsversions of your domain if you plan to use HTTPS later.
Save the file and exit.
Restart the application to apply changes:
docker compose -f docker-compose.prod.yml down
docker compose -f docker-compose.prod.yml up -d
Your EML AdminTool is now configured to accept connections from the new domain.